How to Draw Floor Plans
- Architecture, Interior Design
- February 21, 2022
Floor plans are essential tools before constructing or renovating your house. They’re vital planning tools that pro builders, homeowners, and interior designers use to check the design while renovating or constructing the house. Floor plans provide an envision of the space and a glimpse of what to expect after the construction.
Most individuals find it challenging to develop these plans due to the various things they need to consider. This article provides the appropriate guidelines on how to draw floor plans for your projects or houses.
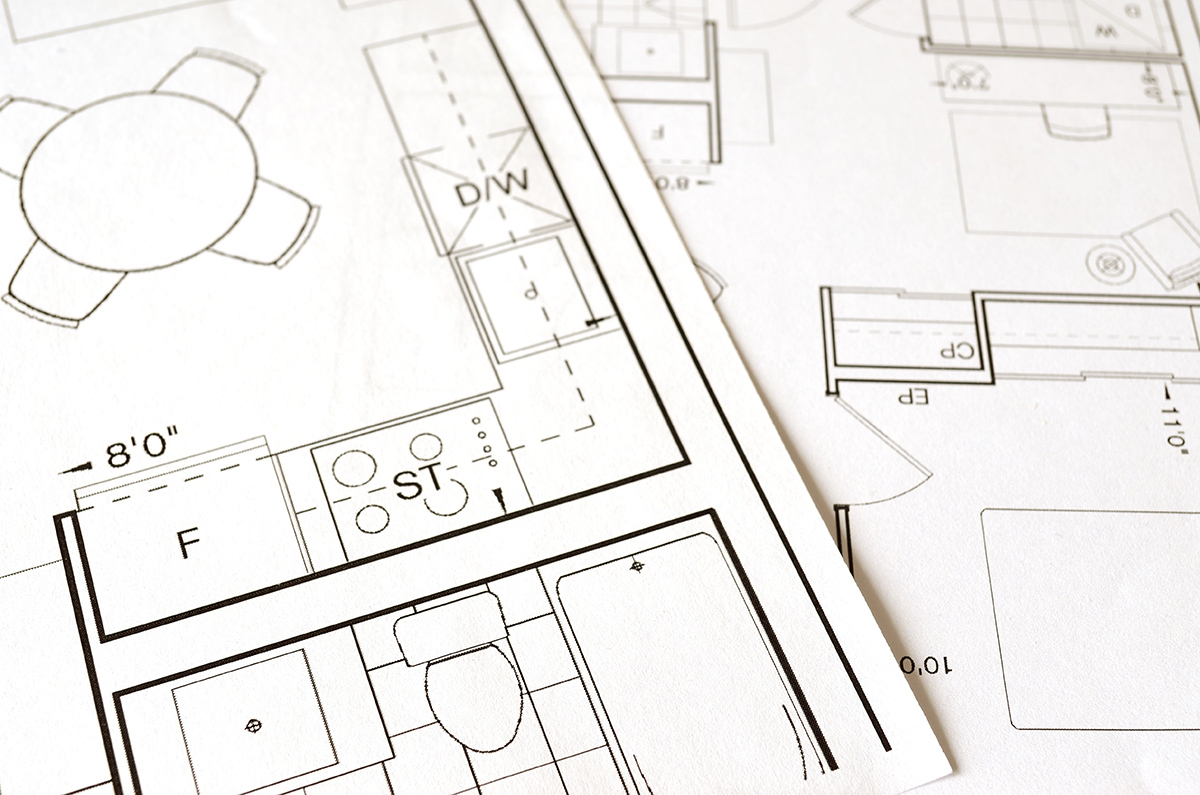
What are Floor Plans?
Floor plans are essential planning tools in a particular 2D graph drawing showing a basic layout of the property or house before construction. The basic layout comes in a scale from the property’s aerial view. These graph diagrams illustrate the relationship between the house or rooms, furniture, and how the owner can move through them after the renovation or construction.
Designers might use them to show different house elements, rooms, pathways and portray the potential flaws before the construction. It’s the starting point for most designers or constructors before drafting the building’s actual blueprints. A proper floor plan ensures you get the appropriate or preferred house design.
How to Draw Floor Plans
We’ve got various ways you can use for drawing your floor plans. For instance, you can draw 2D plans on graph paper using your hand and other equipment or use particular design software to design 3D plans. Regardless of the method you choose for drawing, below are essential steps on how to draw floor plans you should consider:
Step One: Take measurements
Taking the accurate measurement of your construction location is the first and primary step for drawing the plan. You can have an assistant to ensure you get accurate measurements of the walls and rooms.

Photo by Meruyert Gonullu from Pexels
The individual will help you hold the tape measure as you measure across the location or space. Importantly, you can have a rough drawing of the spaces, including the fenestrations or doorways, before having accurate or actual measurements.
Step Two: Transfer your measurement to a graph paper
After getting the measurements, it’ll be vital to transfer them to graph paper with the aid of a proper scale. Traditionally, most designers drew the plans using a quarter-scale, where the quarter inch on the graph paper translates to one foot in actual life. If you lack the appropriate measurement transfer tools like the architect’s scale, triangle, or T-square, you can use the graph paper’s boxes as a guide.
A single box on the paper translates to one foot on the solid ground or space. Therefore, you can use the boxes as a scale for the actual distance on the space or ground. Depending on the actual measurements, count the boxes that represent the measurements and draw your walls considering the grid’s lines. When drawing the walls, experts reveal that you should consider that the interior walls are approximately 5” thick; thus, ensure you account for the thickness when drafting the plan.
Step Three: Create to-scale furniture and cabinetry cut-outs
After creating your floor plan, it’ll be imperative to fill this space with cabinetry and furniture. Before filling the space with the furniture, you must have their actual measurements. You can take the measurement from the furniture you bought or the vendors’ product description.
After having your preferred furniture or cabinets measurements, you can draw them on graph paper to scale. Experts advise that you cut the fixture and furniture carefully after drawing them. Importantly, ensure that you don’t cut the black outlines away while cutting the furniture lines to get accurate measurements.
Step Four: Arrange the fixtures and furniture
It’s usually the most fun part of drawing your plan, as it involves arranging the fixture or furniture on your plan. Based on the scale measurements, you can arrange and rearrange these essentials in the appropriate locations in the floor plan. It’s a critical stage that helps you determine the appropriate furniture that’ll fit in your house.

Significantly, when arranging furniture and fixtures, it’ll be vital to understand the minor and significant pathways’ spacing standards. This spacing allows for easy movement in your house after completion. Below are the spacing standards for the minor and major pathways:
Major pathways
You’ll need to allow approximately 30-48 inches for major pathways. They’re common pathways in the house where two individuals can use the same pathway.
Minor pathways
These are areas or spaces where only one person will move or pass, like entries to the living areas. Experts and designers advise a space of 24-36 inches for these pathways.
Furniture spacing
Significantly, it’d help to allow enough spaces between your furniture, where individuals can pass through, approximately 18 inches. For instance, it can be the space between a sofa and a coffee table. You can choose less space for areas where there is fewer passages or movements like between a chair and aside table
Handicap accessible pathways
These are vital pathways where an individual with a wheelchair can manoeuvre easily. It’ll be imperative to allow at least 36 inches for the wheelchair to have easy access.
Step Five: Create a presentation floor plan
After achieving the desired arrangement of your house on the graph paper, you can have a presentation version. You use it for fun or decorative rug styles or furniture colours. The best way to achieve this presentation version is by laying a translucent paper above your plan and tracing all its elements.

Photo by Andrea Piacquadio from Pexels
You can use a straight ruler to draw lines and choose a thick marker to fill in the interior and exterior walls. You can use different markers or techniques for the different walls, but it becomes time-consuming. After having the floor plan arranging the different furniture and fixtures, you can now consider drawing the elevations.
Summing Up
Floor plans are essential parts you need before designing and starting your construction project. They allow you to turn your concepts into tangible features, make it easy to make necessary adjustments and provide a bigger picture of the project. Most find it daunting to draw an appropriate guideline on drawing floor plans for their projects. But having a accurately drawn floor plan can really help how to decorate your living room and other rooms within your home. The above article provides comprehensive guidelines on how to draw floor plans for your houses or projects.
Thank you for reading our article on How to Draw Floor Plans. If you’re hungry for more architectural and interior design knowledge why no read some articles covering similar subjects such as The Dunmore Pineapple and Pineapple Houses and the Difference Between Villa and Bungalow.


